 Creating a new Help Builder project
The first step in creating a help file is to create a new Help Builder Project. Start by clicking on the New Project button in the toolbar menu bar or selecting File -> New...-> New Project from the menu.

Projects are directory based using a folder structure to hold all assets related to the project. There's an .hbp project file, a set of templates and scripts that determine how topics render, as well as the generated HTML pages and captured or linked images that are embedded into topics. The .hbp file holds all the help file content that you create, which is then rendered into HTML documents when you preview a topic or when you generate your final documentation output.
To create a new project give the new project a descriptive name which is used in the final Help File's title bar. Also provide a company name that is used by default in the copyright notice at the bottom of each topic.
You also need to specify the file location for the project file. By default Help Builder Projects are created in:
<documents folder>\Html Help Builder Projects\<your project folder>.
However you can change the folder to any folder of your choice.
Click on the Next or Finish button to create the project. A new project will now pop up containing only an Index topic:
![]()
This pops up your new project with the Index topic selected. The editor starts up in edit mode so you can see the topic's title and text in Markdown format. A preview window also pops up to preview what the rendered topic looks like in HTML.
This view is the Edit View, which lets you edit your topic. This view also has the external preview enabled.
You can also switch to Viewer Mode from Edit Mode using the Edit toolbar icon or Ctrl-Tab. Preview mode shows only the HTML preview directly in the main content area of the application. While in Edit mode you can toggle the preview using the right browser icon on the toolbar or Alt-V.
![]()
You'll spend most of your time in Edit View using the external previewers to view your topics as you type.
Editing Content
The main topic text is presented as Markdown text by default and presented in a rich text editor window that shows syntax colored markdown text for editing. You can modify any text in the body using the Markdown syntax which is mostly plain text with a few special markup directives.
Markdown
Markdown is a text based format that extends raw HTML and allows for simple representation of many HTML concepts like emphasis (bold, italic, underline etc.), links, images, lists and many other things using simple text based mnemois or text based representations. You can see some of that in the editor in the figure above
Editing a topic
Using edit mode you can use the editor to change the main topic text, or any of the other fields on the active tab or any of the other tabs. Each tab page of options groups a set of common topic values that can be modified.
Most commonly you'll only change the body and title, but many other more detailed options are available for each topic.
To insert any common markup you can use the HTML Editing Toolbar which insert Markdown formatted text into your topic. The toolbar options are great way to learn how to use common Markdown features as they show you what Markdown is required for operations like bolding, italicizing, inserting topic cross links, external links and images, lists and so on.
Whenever you've made some changes, you can explicitly save your content by pressing Ctrl-S. Topics are automatically saved when you navigate to a new topic. Any save operation also forces a refresh of the previewer.
Spell Checking
Spell checking is enabled by default in the editor which shows text that is misspelled and shows with red squiggly underlines. You can right click on the misspelled word to pop up a list of suggestions:
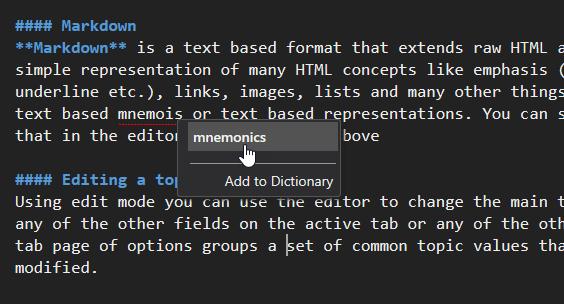
Select the word to replace the text with, or type ESC to exist. You can also add the misspelled word to the dictionary if it's valid word that's not recognized but you know is correct.
Previewing the Current Topic
As shown above the most common way to view your Help Builder content is by using the external previewer. The previewer syncs with the text as you type. The preview is refreshed and synced any time you stop typing for a brief moment.
You can also use the browser icon on the right in the toolbar (the Chrome icon) to preview in a completely external Web Browser. Where the built-in Previewer is part of Help Builder, the external previewer simply renders the current HTML output in your default configured Windows Web Browser for previewing.
The preview shows only the current topic. It's also possible to build the entire project and then preview the entire project in a Web Browser. More on that in the Building Output step later.
See also
Step By Step Guide | Markdown Editing Basics |
Comment or report problem with topic