 The Add-in Manager
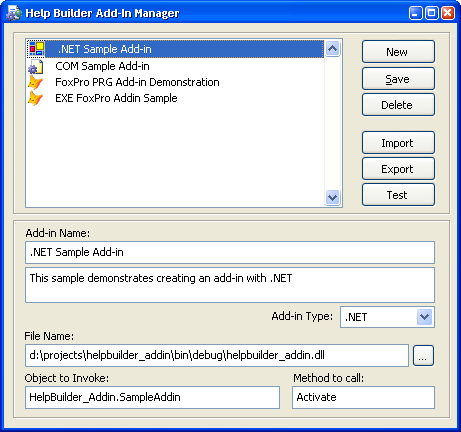
The Add-in manager allows you to load and configure add-ins in Help Builder. Here's what the Add-in Manager looks like:
Installed Add-ins
The listbox lists any installed add-ins. By default no add-ins are installed and none are shipped with Help Builder. If there are entries in the list, the detail information on the bottom automatically updates to display the current add-in's configuration information.The New Save and Delete buttons
These options allow you to create a brand new add-in definition in the lower pane, Save all currently active add-ins to disk and delete the currently selected add-in.New Add-in
To add an add-in to the list there are two mechanisms available:- Use the New button which creates an add-in entry from scratch
- Use the Import button to import a previous configuration
Creating an entry from scratch involves providing a name, a longer description and the type of add-in to create. An add-in can be a .NET assembly, a Visual FoxPro PRG, APP or EXE file, or a COM object.
The filename points to the filename that hosts the add-in. This will be a .NET assembly or the FoxPro PRG/APP/EXE file.
Object names and methods
The Object name is the class that handles the add-in's operation.
- .NET assembly
For a .NET assembly the Object name is the fully qualified type name which includes the namespace and class.For example:
MyNamespace.MySubNameSpace.MyClassnameHelp Builder uses COM Interop in the wwReflection.dll to access your .NET addin by invoking the Add-in in a new AppDomain,
instantiating the type and calling the specified method. When done the AppDomain is unloaded to release the object. - FoxPro PRG/EXE/APP
For FoxPro this will be the name of the class that is contained in the PRG file. For an EXE/APP file the class must be loaded via SET PROCEDURE or SET CLASSLIB in the EXE's mainline. The classname then is the class that gets loaded and the method the method that gets invoked on it. - COM Object
You can also create a COM object that handles events. COM objects don't require a path to the object, although we recommend you add the file path to the COM object anyway so you can create a Help Builder Add-in Configuration with the COM object dll or exe. You need to specify a ProgId for the Object name (AddinSample.AddinSampleServer) and a method (Activate) that is called.
Testing the Add-in
Once the add-in is installed you can click on the Test button to see if it works. Help Builder checks for failures in your add-in and returns an error message if it fails.
Exporting Add-in configuration
Once you've configured your add-in this way, and it works you can export the configuration information to an Add-in configuration file which is stored in the same directory as the filename specified for the add-in. The configuration file writes all of the information for the individual add-in as an XML document into a file with a .hbaddin extension.
Importing an Add-in
If you have developed an add-in you can distribute this add-in configuration .hbaddin file with your add-in in the same directory. This allows users to simply Import the add-in's configuration into Help Builder's add-in manager.
The top section lists all of the installed addins and allows you to create new entries or load a previously configured add-in. A 'configured' add, is one that was previously exported and has an associated .hbaddin configuration file that contains the necessary configuration information. If you are a deve

Comment or report problem with topic