 Customizing your Documentation Layout
Help Builder uses a combination of HTML5 based templates and CSS 3 styling to provide base layout and formatting. You then use the Markdown text format for text editing as you create the content for each topic. Markdown lets you add minimal HTML formatting to your content, while the main page layout is handled by the HTML templates and CSS that drive the UI. This lets you focus on creating content without having to worry about styling as it separates the design from the conent.
Help Builder uses Web standards - HTML5 and CSS 3 plus some JavaScript - in its generated output. All output is generated as Web ready HTML that can be used on a Web site to as responsive pages that work on desktop, tablets and even mobile phones. That content can then also be compiled into Compiled Help files or Word or PDF documents.
Help Builder Themes
Help Builder ships with a set of default themes that provide a few base styles you can start with or that you can customize. The themes are very similar and are customized primarily via CSS styling. A theme consists of:
CSS Stylesheet
The CSS styleeet lets you customize the overall CSS styles using standard CSS3 attributes. Control fonts, font-sizing, white space, colors, transitions etc. as well as layout placement.Layout Template
The Layout Template is a master HTML template that controls the page shell: The HTML header, the page header and footer and the topic list sidebar. You can cutomize this template to provide custom branding by adding images and additional text and contact links etc.Topic Templates
Each topic type in Help Builder has a matching topic template that is used to render a topic. The topic template contains all the fields to embed your documentation content that you created as part of each topic. So the title, body, remarks, examples, linked topics, class information etc. are all rendered into the topic templates.
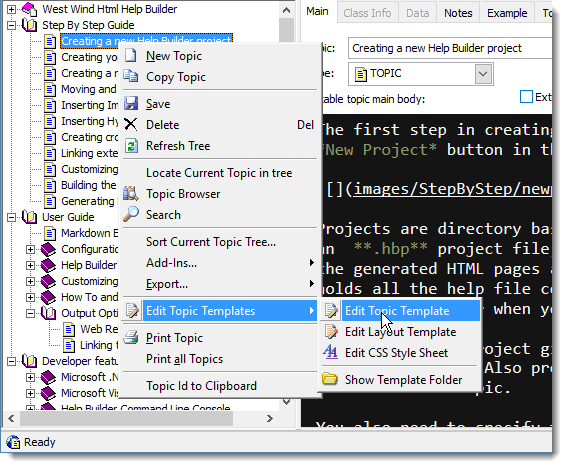
To edit any of these files you can at any time right click in the topic list and select Edit Topic Template... which brings up a context menu that lets you pull up the CSS, Layout and active topic template:
Customization
Some quick and easy things you can do to customize a theme is to change the theme's CSS Stylesheet to change colors, fonts, font-sizes and spacing and change the default icon. To customize the overall layout or branding of your documentation you can change the Logo Image (images/logo.png). You can also customize the base page layout in the Layout Template which controls the base HTML page, header, footer and topic list.
For customization you typically change the Logo Image, the CSS Stylesheet and Layout template.
Logo Icon
images/logo.png
The default templates reference alogo.pngfile which by default is a Help Builder help icon. To use your own icon you can simply override the logo.png file with another file. The default logo height is 58x58px but we recommend you use a file that is around 128x128px.CSS Style Sheet
.\wwhelp.css
The easiest way to customize the overall look and feel of your project's documentation is by customizing the CSS style sheet which lives in.\templates\wwhelp.css. Using standard CSS 3 properties you can customize colors, spacing, font-sizing and overall layout. For example, most of the provided templates only change CSS settings but otherwise share the same templates.Layout Template
.\templates_layout.wcs
The layout template is the master template that contains the core page layout. It contains the HTML header as well as the documents header, footer and topic list layouts. It also contains a< % RenderTopic() % >directive The layout page is rendered for every topic that is rendered so making a change here affects all topics in your documentation.Templates
.\templates*.wcs
Each specific topic type in Help Builder maps to an HTML based template that describes the overall HTML layout of the topic. When a new project gets created these templates are located in the project's TEMPLATES directory and marked with a WCS extension. Each of these templates is a mixture of HTML and some script tags that embed the content of your help topics into the template. You can customize each template and as you do every topic that uses the matching Topic type changes accordingly. Change TOPIC.WCS and all topics of type TOPIC will immediately reflect this change. Changing an individual template affects only topics of the matching Topic type.Custom HTML Markup
Finally you can add custom HTML markup to your topic content. When you type your Body text you can embed HTML either using the double chevron (< >) formatted HTML syntax Help Builder supports, or by embedding raw HTML content intoblocks inside of your topic. Typically this level of markup should be minimal relying primarily on the options that are available from the HTML Editing toolbar, but you can embed any HTML, including script code or DHTML, even XML islands into your topic content.
Documentation Layout
To give you an idea how the Layout and Topic templates interact here's a screenshot which marks up what is rendered for each template:

Layout Template
As you can see the layout template controls most of the page - the header, the topic footer and even the sidebar that contains the table of contents.
Layout Header
The header is contained in a .banner CSS tag and contains the logo, project title and topic title all of which you can customize. The project title, and topic image and title are all embedded using expressions:
<div class="banner">
<div class="pull-right sidebar-toggle">
<i class="fa fa-bars"
title="Show or hide the topics list"></i>
</div>
<img src="images/logo.png" class="banner-logo" />
<div class="projectname"><%= oHelp.cProjectname %></div>
<div class="byline">
<img src="bmp/<%= TRIM(oHelp.oTopic.Type)%>.gif"><%= iif(oHelp.oTopic.Static,[<img src="bmp/static.gif" />],[]) %> <%= EncodeHtml(TRIM(oHelp.oTopic.Topic)) %>
</div>
</div>
Logo Image
The logo lives in images\logo.png and you can easily replace this image with a transparent or square image of your own. By default the image is rendered at a height of 58px (check the style sheet!) so your image should be bigger than that and preferrably square. We also recommend an image twice the size (the default logo is 128x128) to allow for high dpi displays.
Table of Contents
The table of contents is created as an external tableofcontents.html file and dynamically loaded into the page using JavaScript. The initial page renders an empty nav tag which is filled when the page is loaded:
<div id="toc" class="sidebar-left toc-content">
    <nav class="visually-hidden">
        <a href="tableofcontents.htm">Table of Contents</a>
    </nav>
</div>
Note the initial invisible link to tableofcontents.html, which is used for Search Engine Optimization (SEO) to pull in a reference to the table of contents so the table of contents will be indexed by search engines even though topics are loaded via JavaScript.
JavaScript code then loads the tableofcontents.html page and extracts the actual topic list and embeds it into the page in the #toc element. The tableofcontents.html file is generated when the project is compiled and uses the tableofcontents.wcs template to generate its output. This template lets you customize the layout above the actual tree of topics which includes the menu buttons and the search box. To customize the visual aspects of the actual topic list you can look at the .toc related CSS styles in wwhelp.css.
Layout Footer
The layout footer contains some static branding and copyright information that you very likely will want to customize. The default template embeds a copyright and date and an email link to let users provide feedback on topics. You can remove that link if you don't want this behavior or route it to an application rather than an email address.
<hr />
<div class="pull-right">
<a href="http://helpbuilder.west-wind.com" target="_blank"><img src="images/wwhelp.png" /></a>
</div>
<small>
© <%= oHelp.cProjCompany %>, 1996-<%= Year(Date()) %> •
Updated: <%= TTOD(oHelp.oTopic.Updated) %>
<br />
<a href="mailto:support@west-wind.com?subject=<%= TRIM(oHelp.oTopic.Topic) %> (<%= oHelp.oTopic.Pk %>)&body=Topic: <%= oHelp.cProjectName %> - http://helpbuilder.com/docs/<%= oHelp.oTopic.Pk %>.htm">Comment or report problem with topic</a>
</small>
<br class="clearfix" />
<br />
Topic Content
The most important part of the document however is the actual topic content which renders into the main part of the layout. The topic content displays the content you've typed into each Help Builder topic. This includes the title (which was also rendered into the Layout template), the body, remarks, topic links and any class information that might be associated with developer related topics. Each of the templates renders title and topic and a few others, but some templates like classheader for example render a number of additional values.
Templates use ASP classic style syntax using < %= expression % > tags to embed content. Here's what the Header template looks like:
<% Layout="~/templates/_Layout.wcs" %>

<header class="content-title">
    <img src="bmp/<%= TRIM(oHelp.oTopic.Type)%>.gif">
    <%= iif(oHelp.oTopic.Static,[<img src="bmp/static.gif" />],[]) %>
    <%= EncodeHtml(TRIM(oHelp.oTopic.Topic)) %>
</header>

<div class="contentbody" id="body">
<%= oHelp.FormatHTML(oHelp.oTopic.Body) %>
</div>

<% IF !EMPTY(oHelp.oTopic.Remarks) %>
<h3 class="outdent" id="remarks">Remarks</h3>
<%= oHelp.FormatHTML(oHelp.oTopic.Remarks) %>
<% ENDIF %>

<% IF !EMPTY(oHelp.oTopic.Example) %>
<h3 class="outdent" id="example">Example</h3>
<%= oHelp.FormatExample(oHelp.oTopic.Example)%>
<% ENDIF %>

<% if !EMPTY(oHelp.oTopic.SeeAlso) %>
<h3 class="outdent" id="seealso">See also</h3>
<%= lcSeeAlsoTopics %>
<%  endif %>
Embedding content - The oHelp object
The key to getting content into the page is the oHELP object that is 'passed' into this script page. The oHelp object is a global object that is visible throughout the page and makes it possible to embed content. The layout for this object is described in the wwHelp Class documentation.
The most important thing to know about is the oHelp.oTopic subobject which contains all the content of the currently selected help topic. So oHelp.oTopic.Body returns the body of the current topic. oHelp.oTopic.Topic returns the title of the current topic and so on. For the field information take a look at the Topic data field layout field.
Because the wwHelp object is fairly complex you can also write fairly sophisticated code against it. You can run queries against the help file for example and retrieve topics of your choice then render them. The WHATSNEW template is a good example of this sort of code based content creation:
<%
cCurrentPk = oHelp.oTopic.Pk
cHTML = ""
oTopics = oHelp.GetTopics("ARRAY","type # 'WHATSNEW'",;
                          "updated DESC TOP 35","ParentPk,Pk")

If !ISNULL(oTopics) AND oTopics.nCount > 0
	cHTML = cHTML + "<H3>Recently updated topics</H3><p>"
	cHTML = cHTML + "<table align='center'>"
	cHTML = cHTML + "<tr><td><b> Name</b></td>"
	cHTML = cHTML + "<td><b>Description</b></td>"

	For lnLoop = 1 To oTopics.nCount
		oHelp.LoadTopic(oTopics.aTopics[lnLoop,2])
		cHTML = cHtml + "<tr><td Align = 'Left' VAlign = 'Top'>" + TopicLink(oHelp.oTopic.Topic,oHelp.oTopic.Topic) +;
		                "<br>" + DTOC(oHelp.oTopic.Updated) + "<td Align ='Left' VAlign ='Top'>"

		lcBody = oHelp.FormatHTML(oHelp.oTopic.Body)
		nBreak = ATC("<p>",lcBody)
		IF nBreak = 0
		   nBreak = ATC("<br>",lcBody)
		EndIf
		IF nBreak > 1
		   cHTML = cHTML + LEFT(lcBody,nBreak - 1)
		ELSE
		   cHTML = cHTML + lcBody
        ENDIF

		cHTML = cHTML + "</td></tr>"
	EndFor

	oHelp.LoadTopic(cCurrentPk)
	cHTML = cHTML + "</table><p>"

	Response.Write( cHTML )
EndIf
%>
This code runs a query and retrieves the 35 topics that were last updated and displays them in an HTML table. The output generated is plain HTML and embedded into the document via Response.Write() - again like ASP.
This is very powerful indeed. There are also a handful of highlevel helper functions available that make quick work of table generation. All of this information is available in the Developer features section of the Help File.

Comment or report problem with topic