 Capturing Images with SnagIt
Help Builder provides direct integration with SnagIt from Techsmith, which is a wonderful tool to handle screen captures in a user friendly and efficient way. It also provides a user friendly image editor and effects manager for your screen captures all inline of the capture process. If you do a lot of screen captures SnagIt is a must have!
SnagIt use must be enabled in the Options | Help Builder Settings using the Use SnagIt for screen captures if available checkbox. There's also a link for configuring SnagIt capture operation here.
To capture and insert an image, go into the Topic Editor and enter any of the edit regions. Click on the camera Screen Capture icon. Help Builder minimizes before the capture begins.
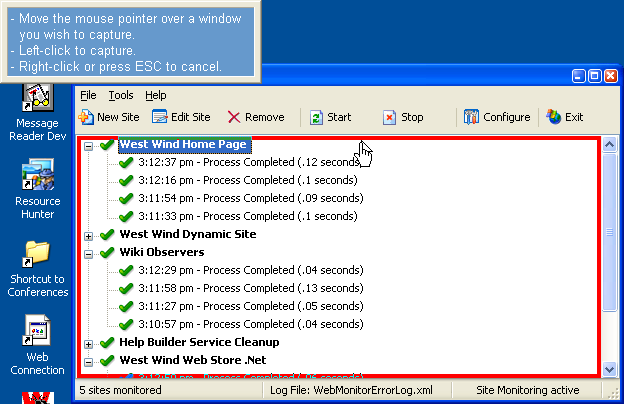
By default Help Builder uses SnagIt's Window capture mode which allows you to select a window or object from your screen which is shown in the figure above. In this mode SnagIt requires that the Window or content your capturing is otherwise fully visible - once in capture mode the desktop cannot be re-arranged, therefore it's important that you make sure that the window your working with is on top or otherwise fully visible on the desktop.
Once the capture is complete the SnagIt image editor is displayed and you can use the Save As option to save your file. Help Builder defaults to your project's \Images directory or your last used image save directory and the PNG image format for saving your image.
If you invoked the Screen Capture button using the Toolbar button while in Edit Mode, Help Builder will immediately insert the link into the current text editing area at the cursor selection and you should find a reference like this:
<img src="images/newcapturedimage.png">
so, capturing and insertion happens all in one smooth operation. If you only want to capture an image and not insert a link immediately use Tool | Capture Window/Screen from the menu instead.
Configuring SnagIt operation
Window object capture is the most common way to capture screen shots, but you can also configure many of SnagIt's other capture modes with Help Builders SnagIt configuration for which is accessible in the Options Dialog next to the SnagIt integration checkbox or as a dropdown option below the Screen Capture icon in the Edit toolbar.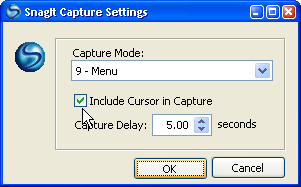
You can choose from many of SnagIts various capture options as well as choosing to add the mouse cursor and doing delayed captures. Delayed captures display a counter in the bottom right corner of the screen.
Please refer to the SnagIt documentation for information on the various capture modes available and how they operate.

Comment or report problem with topic